
Posted on 02, April, 2015
Last Modified on 14, March, 2023
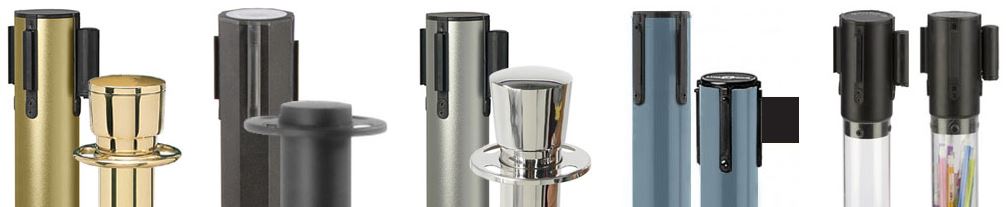
Shop Products from This Guide


Knowing that you need a crowd control system for your business is only the first step. Determining how many posts and belts you need, how to set up your stanchions, where you should put signs can also be quite a task. You'll want to think of colors, whether you want professional black posts with retractable belts or upscale brass post and rope stanchions. In this article we'll guide you through a few common stanchion configurations that should help you get the ball rolling with your business's crowd control management.
How Many Posts Do I Need?
The first step to determining the number of posts you’ll need is choosing a layout. Look at your space, sketch out some ideas, and come up with some designs that fit your needs (or read on for some examples you can use).
Once you have your layout, the next step is to measure the length of each run. That means standing in the actual space with a tape measure (and maybe some masking tape on the floor to get it just right). What is a run? A run is any straight line of posts connected by belts. It’s okay if you don’t know exactly how many posts you need, but you should know that a post will always be at either end of a run or at any place two lines intersect or form an angle. Here are some examples of runs:
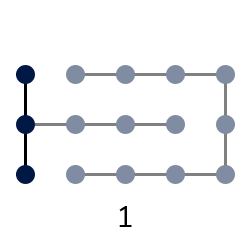
Remember: If no belt would connect two sections, they’re two separate runs. Don’t measure around angles, either. Treat each turn or break as a new run. Simply measure each straight line and record the length. Once you have the length of all your runs, it’s time to do some math.
Since the standard spacing between posts is about six feet, you can use that as a starting point.
- To find the number of posts you need for each run, divide the length by six, round up to the next whole number, then add one (for the end post).
- To determine how far apart to set the posts in the run, subtract one from your number of posts, then divide the length by that number. That will tell you how many feet apart to place them.
Here are a few examples:
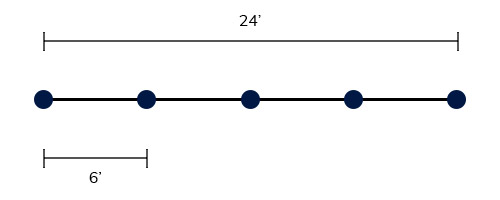
A run of 24 feet would require five stanchions spaced six feet apart:
(24 ÷ 6 = 4) + (1) = 5
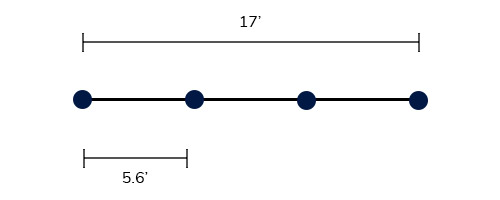
A run of 17 feet would require four stanchions spaced about five and a half feet apart:
(17 ÷ 6 = 2.8 ≈ 3) + (1) = 4
17 ÷ 3 ≈ 5.6
Once you know how many posts you need for each run, you can find the total number of posts you’ll need:
- First, add together the number of posts needed for each run. Unless you’re making a simple straight line, you’ll have some shared posts, so we’ll need to account for that in the next step.
- Next, look at your layout and count the number of times two runs meet. This could be an intersection or a corner.

- Then simply subtract that number from your total. Now you should know exactly how many posts you need!
Of course, the six-foot distance is not a hard-and-fast rule, and you should consider the overall distance you need to cover and the shape of your layout. Because you're rounding up or down a little, you may have to step back and make some on-the-fly spacing adjustments after eyeballing it, but that's okay! Visually-consistent spacing is more important than pinpoint accuracy. It can help to sketch a quick diagram and do a few calculations like the one above to figure out what spacing distances divide evenly into your total length. Keep in mind however, that many retractable belt stanchions only span 6.5', and if you plan to have longer spans, you'll need to purchase a set that comes with longer belts, such as our QueuePole.Deluxe stanchions, which come with 10' belts.
It's also okay to play with different spacings for different segments of your layout. For instance, when joining an express lane with a standard snaking layout, you might need a longer run on the barrier that joins them to make them appear visually distinct. Or, the long side of your L-shaped configuration might be longer than the inside angle. As long as you apply your calculated lengths intentionally and make sure that straight runs are spaced evenly, the finished product will come out looking great!
The goal for the overall setup is to have a cohesive look. After all, retractable belt barriers are visual indicators — they're not great at physically blocking entry, just providing a guide to show guests where they are expected to go.
Now that you know how to calculate the number of posts to buy, let's look at some common configurations:
*A light blue dot indicates a great spot to put a stanchion mounted sign!
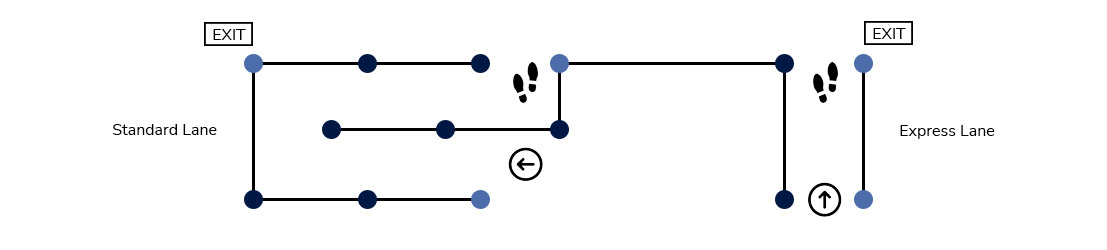
Standard Setup with an Express Lane
This is one of the most popular setups. As you can see below, this design features a standard lane for a large quantity of customers. There is then an "express" lane which is commonly used for business customers, VIPs, handicapped patrons, or any customers you want to give the white glove treatment. This is a setup most commonly seen in banks, but can also be used for car rental lines, and ticket lines.
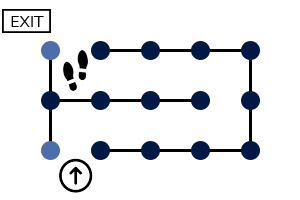
U-Shape
This stanchion format is ideal for ticketing offices and businesses with slower service. As you can see, the layout is for a single line but helps optimize floor space by guiding customers in a weaving pattern. A large number of patrons can get into this line to wait for service. This may look familiar to a waiting line you might see at an airport when checking in.
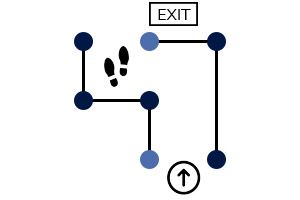
L-Shape
Here is a simple design great for a cashier’s line, fast food restaurant, coffee shop queue, or concession stand. Use top-mounted stock stanchion post signs for directing traffic. These sign toppers comes in all types of post finishes. Stanchions also come in many different colors including black, gold and silver.
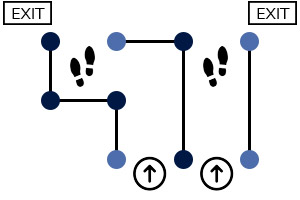
L-Shape w/ Express Lane
This configuration is a common version of a teller station. This layout is perfect for smaller banks, airports, gift shops and concession lines. Different types of signs are available as well as many colors of rope to match any business decor.
Don't Forget Signs and Accessories!

In order for your customers to be able to differentiate lines and have a smooth queue, you must bring informative signage into the equation. Many signs feature pre-printed messages, while others come with replacement letters for constantly changing signage needs. When purchasing signs for your new crowd control queue line you must remember that no sign is complete without a frame. The sign's frame will usually attach right to the top of your posts or stanchions very easily. This type of stanchion-top sign is great for restaurants, banks, hotels, airports, and any other business setting you can think of!
And don't sleep on stanchion posts as a potential branding opportunity! With cloth wraps and cardboard sleeves that offer custom printing, your logo or seasonal messaging can be fully integrated into your crowd control configuration. Explore those enhancements and more in our selection of stanchion signs and accessories.
Now, go have fun mixing and matching some posts, belts, ropes, and sign toppers in your business. These crowd control configurations are just what you need to get going with your line setup!